

Solar Panel Installation
Pearl Solar Panels based in Reading, Berkshire offers grid connected system solutions for any commercial or domestic situation including roof mounted, freestanding and solar tracking units. We can also provide 'Off grid" stand alone systems, for settings where a mains electricity supply is not available, to power environmental testing stations, automated gates, agricultural equipment and just about anything else.
We offer a range of other building services to compliment our solar energy business including voltage regulation systems, roofing and property maintenance. If you have other works that could be carried out alongside your solar energy system installation, perhaps utilizing the scaffolding already on site for example, please feel free to discuss it with us during our initial survey.
All of our works are expertly carried out in line with current legislation and industry codes of conduct by our teams of qualified installers. We work closely with our clients and the local authorities to ensure the successful design, installation and commissioning of our systems.
Our guarantee to you:
- NO hard selling
- Every solar panel system is designed and optimized specifically for your home
- Great savings passed on directly to you
- Highly trained and qualified specialist electrician and panel installers carry out every installation
- Full Warranties for both panels and workmanship on every installation
Step by step installation of a Pearl Solar Panel system
(typical roof mounted grid connected example)
Step 1
Technical Survey:
Our technical survey team will visit you at a convenient time for around 40 minutes to accurately measure and assess the site for the solar panel installation.
Step 2
Scaffolding:
Scaffolding goes up normally a day or two before the installation is booked to take place.
Step 3
*Mounting Kit:
Our installers start by securing the mounting kit to the rafters of your roof. We only use quality engineered mounting systems that have been tested for wind and snow loading in the UK. Extra care is taken to ensure that the roof is kept water tight.
Step 4
*PV Panel Installation:
The panels are secured to the mounting kit.
Step 5
*Electrical Connection:
Our qualified electrician connects the system to the main consumer unit (fuse box) in your home and tests the system.
Step 6
Completion:
After a thorough set of checks, the system is commissioned, switched on and handed over.
The scaffolding is then removed and the area is left clean and tidy.
Application for tariff payments: Once Pearl Solar Panels issues you our compliance certificate, you need to apply to receive the FIT payments. This requires you to fill out a simple form which you should obtain from an existing energy supplier (some suppliers allow this to be done on-line). We will be pleased to offer any help that you require with this simple form should you require our assistance however the application must come from you.
You are now producing electricity from your system, being paid by your chosen supplier and helping the environment at the same time.
*Please note that the install team can generally complete all of their work in one day. In the odd case where this is not possible, we aim to complete the installation the following morning.
CLICK TO ENLARGE
Want to know more on how solar panels work?
A little technical knowledge:
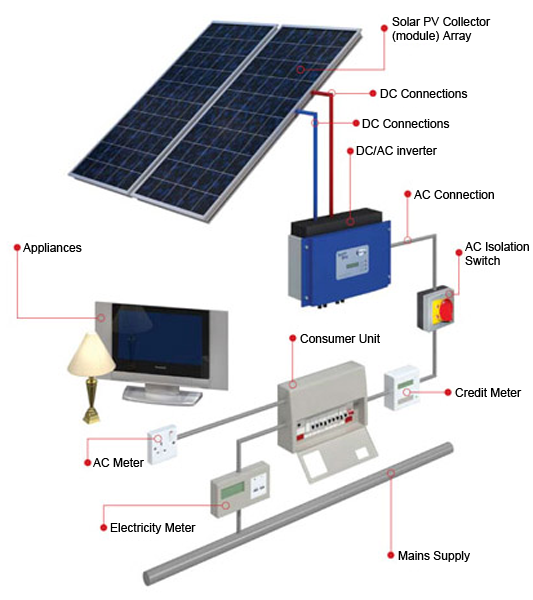
PV cells are made from layers of semi-conducting material, usually silicon. When light shines on the cell it creates an electric field across the layers. The stronger the sunshine, the more electricity is produced. Groups of cells are mounted together in panels or modules that can be mounted on your roof.
The power of a PV cell is measured in kilowatts peak (kWp). That's the rate at which it generates energy at peak performance in full direct sunlight during the summer. PV cells come in a variety of shapes and sizes. Most PV systems are made up of panels that fit on top of an existing roof, but you can also fit solar tiles.
The first step is usually to bolt the panels to the roof via mounting kits, with the electrical wiring coming last. The system will normally use one inverter, typically mounted in the loft space, that will convert the Direct Current (DC) electricity, produced by the panels, into Alternating Current (AC) that is supplied by the national grid and used by us in our homes and workplaces.
The installer will register the site with the Microgeneration Certification Scheme (MCS), and you will get a certificate by email which allows you to claim Feed-In-Tariffs..
Pearl Solar Panels will:
- Show you how to operate the system and how to spot faults
- provide information on maintenance requirements
- give you a pack with all the manuals and warranties.
Connection to the grid
Pearl Solar Panels will liaise with your District Network Operator (DNO) to allow you to connect your solar PV system to the national grid.
- Typical systems up to 4kW (16no x 250w panels) -
- Pearl Solar Panels can simply inform the DNO within 28 days after commissioning that a connection has been made
- Larger systems over 4kW -
- Pearl Solar Panels will need to get permission from your DNO before any connection to the grid is made.*
* In the case of larger systems (over 4kW) the DNO will carry out a network study (which it may charge you for) to ensure that the local grid network can take the extra power that your solar PV system will generate. If the local grid network needs extra work before it can accept your connection, this will have to be done at your own cost. The DNO has 45 days to provide you with a quotation for this work; it must be able to justify the costs it wants to charge, and this is regulated by Ofgem.
